
To manage your finances digitally, learn “How to Create Easypaisa Account”. In this detailed and comprehensive guide, you will get the easiest and the quickest Easypaisa Account Banane ka Tarika ایزی پیسہ اکائونٹ بنانے کا طریقہ.
Easypaisa is the leading mobile wallet in Pakistan which offers an easy and user-friendly approach to handling transactions, paying bills, and sending money. If you are a new user and want to simplify your financial tasks, you must create an Easypaisa account as it’s a user-centric app providing security and convenience at one time.
In this article, we will provide you with a complete and step-by-step guide to open your account from scratch along with the prerequisites you need to open the account. By the end of this article, you will be fully equipped with the knowledge of creating your digital wallet with confidence.
Prerequisites for Creating an Easypaisa Account
Before you start, make sure you have the following essentials with you:
- CNIC (Computerized National Identity Card): Your valid CNIC is required for account verification.
- Active Mobile Number: The number you use to create the account must be registered under your CNIC.
- Smartphone: Easypaisa works through its mobile app, so a smartphone is essential. You can also use a dial-pad mobile for this if you want to go manually without the app but the app is preferred to easily manage finances afterward.
- Internet Connection: A stable connection is necessary to download the app and register your account.
Assure these essentials so you don’t face any problems while proceeding with the account creation.
If you have already created your account but it is deactivated due to any reason, then it’s not necessary to create another one rather go for unblocking Easypaisa account.
So, let’s get started!
Table of Contents
How to Create Easypaisa Account on Mobile
It’s very easy to create an Easypaisa account on mobile and all the steps go very smoothly with the mobile app. Follow these steps to set up your account:
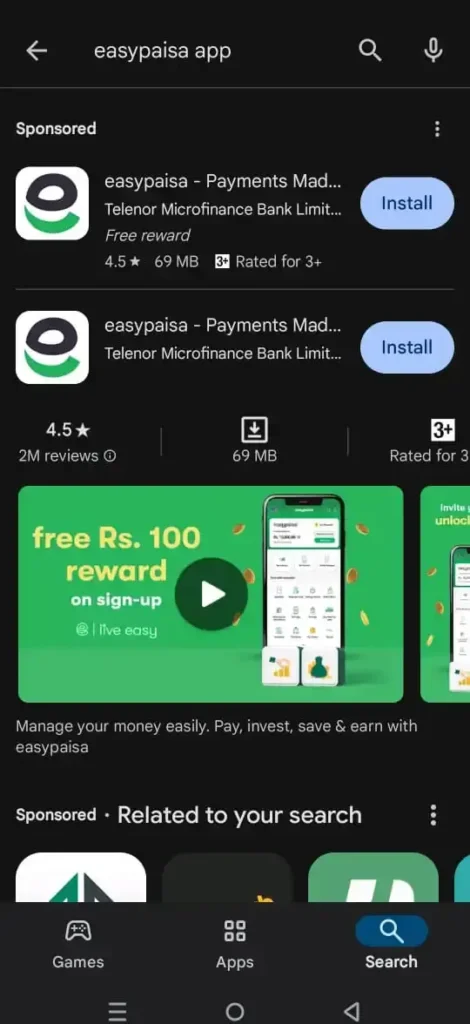
Step 1 – Download the Easypaisa App
- For Android Users, open the Google Play Store and search for “Easypaisa” in the search bar and click “Install”.
- For iOS Users, open the Apple App Store to search for the “Easypaisa” app and tap “Get”.
You must download the app developed by Telenor Microfinance Bank for security purposes.
Step 2 – Launch the App and Start Registration
- Once the app is installed, open it.
- You will be greeted with a welcome screen.
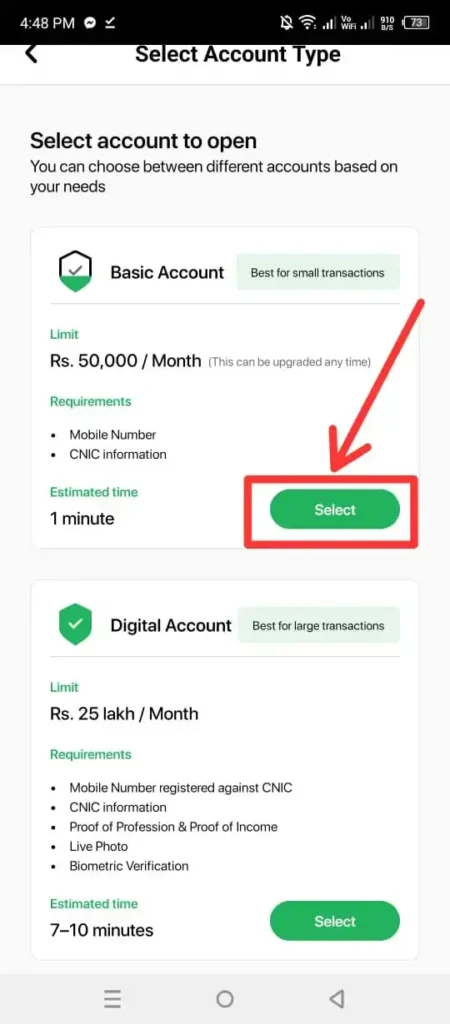
- Click on the “Create My Account” option to start the registration process.
- There you will see options to select according to your account type.
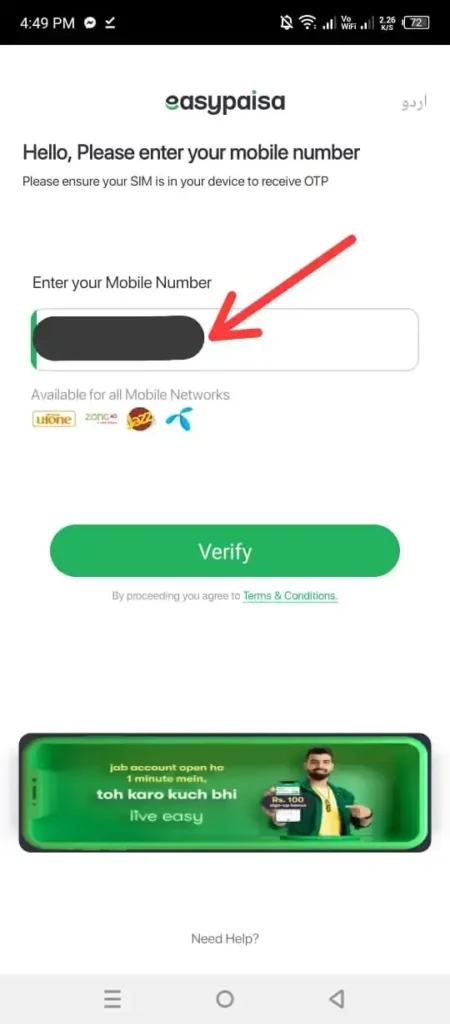
Step 3 – Enter Your Mobile Number
- You must enter your active mobile number that is registered against your CNIC.
- You can use any SIM either Telenor, Ufone, Zong, or Jazz for this.
- You will receive a 5-digit verification code via SMS on this mobile number.
Step 4 – Enter the Verification Code
- Once you receive the SMS, enter the 5-digit code in the app. It will be auto-detected in some cases and if not, then enter it manually.

- If you don’t receive any code within a few minutes, you can request it again.
Step 5 – Provide Your CNIC Details
- Enter your CNIC number in the required field.

- Then, for security purposes, you need to enter the issuance date of CNIC.
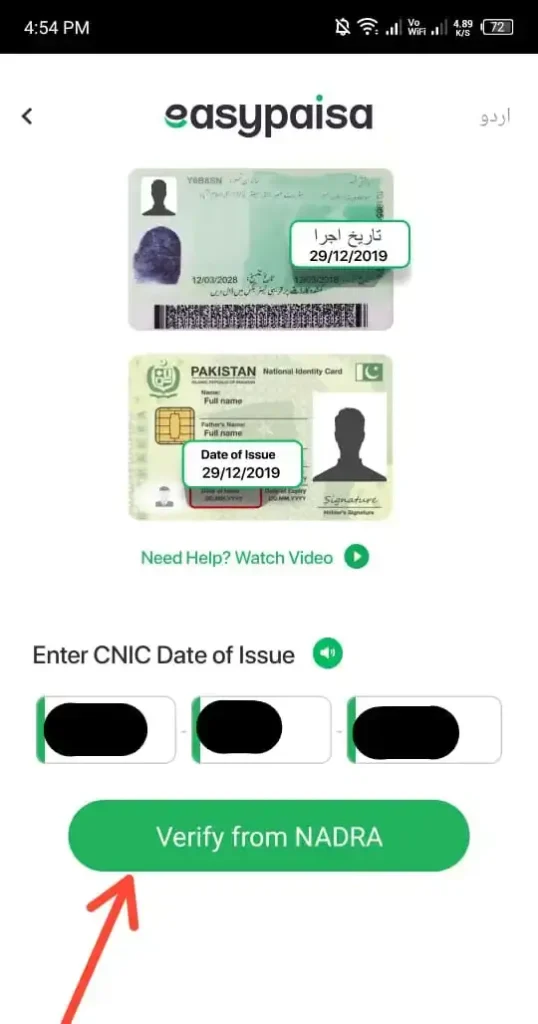
- You may also scan it to avoid manual entry.
- Always scan your CNIC in a well-lit area so that you may not face scanning problems.
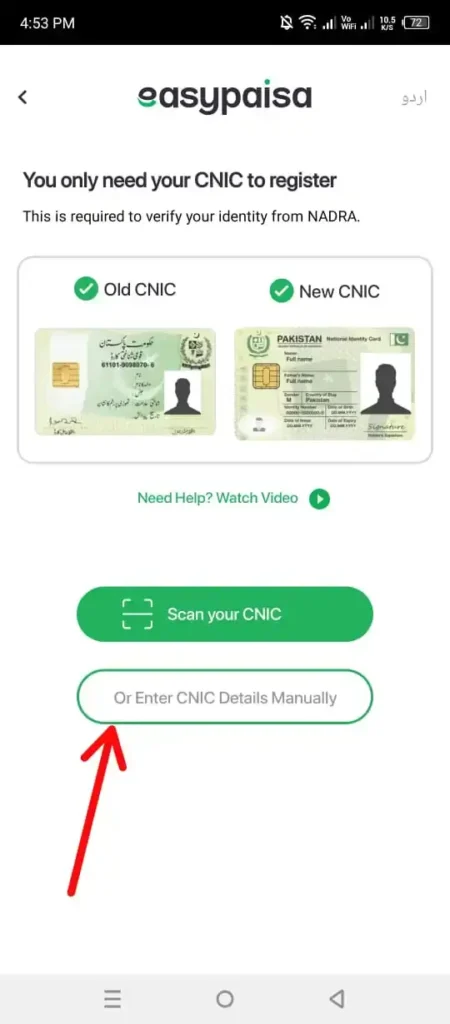
- Also, make sure that your CNIC is valid and correctly entered to avoid registration issues.
Step 6 – Create a PIN
- You will be asked to create a 5-digit PIN that you will use every time you need to sign into the app to perform any transactions.
- As this PIN will be used for logging in every time, so make sure it’s something you will remember but isn’t easily guessable for hackers.
Step 7 – Set Up Your Profile
Now, it’s time to set up your profile.
- Enter your personal details, such as your full name, date of birth, and address.
- It’s a must to review the information for accuracy before proceeding.
Step 8 – Agree to the Terms and Conditions
- Carefully read through Easypaisa’s terms and conditions.
- Tick the checkbox to agree with them and then proceed to finalize your account creation.
Step 9 – Account Activation
- Your Easypaisa account is now created but needs activation.
- You will receive a confirmation SMS once your account is fully activated and ready to use.
Easypaisa Account Banane ka Tarika
For our Urdu-speaking users, here’s the Easypaisa account banane ka tarika (method to create an Easypaisa account):
- Apne smartphone par Google Play Store ya Apple App Store se Easypaisa app download karein.
- App kholne ke baad “Create My Account” par click karein.
- Apna active mobile number daalein jo aapke CNIC se registered hai.
- SMS mein aane wala 5-digit code app mein enter karein.
- Apna CNIC number sahi tarah se daalein.
- 5-digit PIN banayein jo aapke liye yaadgar ho lekin aasani se guess na ho.
- Apni personal details jaise naam, tareekh-e-pedaish, aur address bharain.
- Terms and Conditions ko padhein aur checkbox tick kar dein.
- Confirmation SMS ka intizar karein aur aapka account ready ho jayega.
- پلے سٹور سے ایزی پیسہ ایپ ڈائون لوڈ کریں۔
- انسٹال کرنے کے بعد اکائو نٹ بنانے والے آپشن پر کلک کریں۔
- اپنا ایکٹو موبائل نمبر ڈالیں۔
- ایس ایم ایس کے ذریعے موصول ہونے والے کوڈ کو ایپ میں لکھیں۔
- اپنا سی این آئی سی نمبر صحیح طرح لکھیں۔
- پانچ ہند سوں پر مشتمل ایک پن بنائیں گو کہ با آسانی یاد رہنے والی ہو۔
- اپنی پرسنل تفصیلات ڈالیں۔
- قوائد و ضوابط کو غور سے پڑھیں اور چیک باکس ٹک کریں۔
- اپنا اکائونٹ تیار ہونے تک کنفرمیشن میسج کا انتظار کریں۔
How to Create Easypaisa Account Without App
We will provide you with all the details about creating your account without an app on your simple mobile, whether you are a Telenor or a non-Telenor user.
If you are a Telenor user, then you can follow the below-mentioned guide to set up and access your Easypaisa account without the app.
Follow these steps to get started:
Step 1 – Dial the USSD Code
- In order to start the process, dial the USSD code *786# from your Telenor SIM.
- This will open the Easypaisa service menu, where you can start the account setup process.
Step 2 – Enter Your CNIC Number
- You will be asked to enter your Computerized National Identity Card (CNIC) number.
- This step is important for identity verification and linking your account to your national identity.
- Tip: Make sure to have your CNIC to avoid any delays during the process.
Step 3 – Enter the Date of Issuance
- After entering your CNIC number, you will need to provide the issuance date of your CNIC.
- This will further increase the security of your account and confirm your identity.
Step 4 – Create a 5-Digit PIN Code
- Next, you will be asked to create a 5-digit PIN.
- Choose a PIN that is secure and easy to remember.
- Security Tip: Avoid using obvious numbers like 12345 or your birthdate.
Step 5 – Confirm Your PIN Code
- Re-enter the 5-digit PIN to confirm it.
- In this way, you will be sure that you have put the correct PIN without any typos for future login.
Step 6 – Access Your Easypaisa Account
- Once you have completed the steps above, you will be logged into your Easypaisa mobile account.
- Although the options are limited without an app, still you can navigate through various options such as performing transactions, checking balances, paying bills, and more – all directly from your Telenor SIM.
How to Create Easypaisa Account on Zong, Jazz, and Ufone
For users on Jazz, Ufone, or Zong networks, the process of setting up and accessing your Easypaisa account is very similar to that for Telenor users with slight variations.
Here is how you can do it:
- From your Jazz, Ufone, or Zong SIM, dial *2262# to access the Easypaisa service menu. This code is specific to these networks and will initiate the account setup process.
- Just like with Telenor, you will need to enter your CNIC number. This is required to verify and link your account to your identity.
- The rest of the steps are the same – the CNIC entry, issuance date, 5-digit PIN, and setting up of your site.
- After completing these steps, you’ll be logged into your Easypaisa account. From here, you can use various features without needing the Easypaisa app.
Account Creation Via SMS
This method is particularly useful for those using basic mobile phones and having a SIM from Jazz, Ufone, or Zong. They can also create their account via this easy SMS message.
Here it is how:
- Start the process by opening the SMS application on your mobile phone and composing a new message.
- In the message body, type the letters “EP” and put a space after it.
- After typing “EP”, enter your CNIC number (Make sure to include the dashes in the CNIC number for proper formatting).
- This message should be like this: “EP 36300-0000000-0”
- Once you have composed this message, send it to the official Easypaisa number: 0345-1113737.
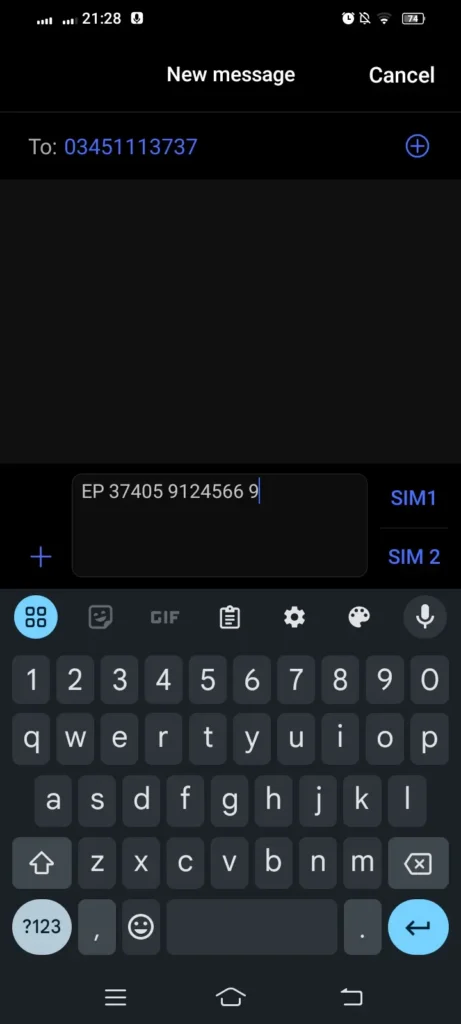
- This will initiate the process of creating your Easypaisa account.
- After sending the SMS, you will receive different messages with further instructions.
- These messages will guide you through setting up a 5-digit PIN for your account.
- In order to set the PIN, type “PIN” then add space and your 5-digit PIN code, add space, and again enter the PIN code to confirm it. It must be like: “PIN ***** ***** “.
- Send this to 0345-1113737.
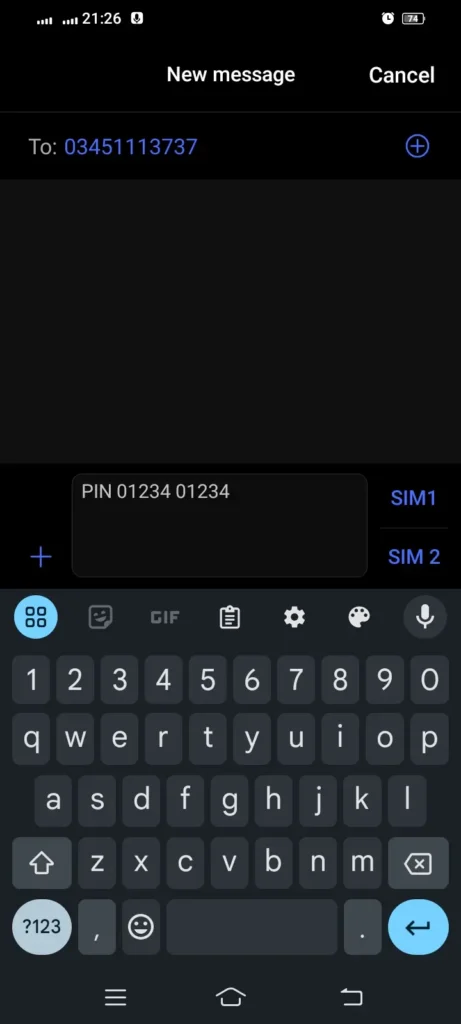
- Once your PIN is set, your Easypaisa account is ready to use.
- You can now access your account, check your balance, send money, and perform other transactions with the mobile keypad.
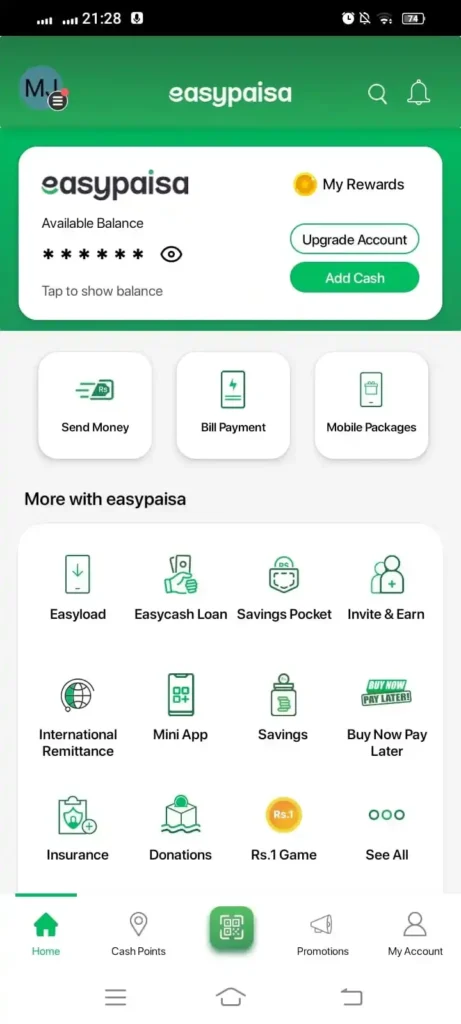
How to Use Your Easypaisa Account
Once your account is set up, you can start using it immediately. Below here, we have provided instructions to perform some important transactions.
Here is how you can do this:
1. How to Add Money to Easypaisa Account
- One can go to any Easypaisa shop, Telenor franchise, or authorized agent to load money into the account.
- You can use your bank’s online portal to transfer funds directly to your account.
- You can send money from another Easypaisa user by selecting the “Send Money” option within the app.
- In the same way, you can also receive payments directly into your account from others.
2. Paying Bills and Sending Money
- Go to the “Pay Bills” section within the app to settle utility bills, school fees, and more.
- Select the “Send Money” option, enter the recipient’s details, and confirm the transaction using your PIN.
3. Shopping Online and In-Store
- You can use your Easypaisa account to shop online at partner websites that accept Easypaisa as a payment method.
- One can also pay in-store for merchants accepting Easypaisa by scanning QR codes or entering the merchant’s Easypaisa number.
4. Additional Services
- One can easily recharge your mobile balance or your loved one’s numbers directly through the app.
- You can book movie tickets, flight tickets, and other services from the comfort of your home.
Troubleshooting Common Issues
If you encounter any problems while creating or using your Easypaisa account, here is what you can do:
- Verification Code Not Received: Make sure your phone has network coverage, and the number entered is correct. Try requesting the code again after a few minutes.
- Incorrect CNIC Information: Double-check the CNIC number you entered. If it’s incorrect, restart the registration process with the correct details.
- Forgotten PIN: Use the “Forgot PIN” option in the app to reset it. You may need to answer security questions or verify your identity through your CNIC.
- App Crashes or Freezes: Ensure your app is updated to the latest version. If problems persist, reinstall the app or contact Easypaisa customer support.
- Account Not Activating: If you haven’t received the activation SMS within a reasonable time, contact Easypaisa support to verify your account status.
Final Words
This is the complete guide related to the Easypaisa account creation, verification, and usage with or without the app via Telenor or other networks. It’s a straightforward process, providing you with convenience and financial freedom. Whether you are using Jazz, Zong, or any other network, the steps remain user-friendly and accessible.
So create your account, pay bills, send money, or shop online as it’s your reliable companion in the digital age.