Creating an email signature isn’t just about adding your name; it’s about branding and professionalism. So, quickly learn in this guide about “How to Add Signature in Gmail”.
Gmail is Google’s free email service, and it has now changed everything about how we communicate in the digital age. It’s secure and easy to use and that’s why every freelancer, business owner, working person, or even student, is using this platform for daily communication tasks.
Taking it fast, you might want to make a lasting impression professionally and that’s why you are here to learn about adding signatures to your emails.
In this guide, you will learn everything about adding your first Gmail signature to mastering advanced options, and also troubleshooting some common issues.
Why Adding a Signature in Gmail is Important
First thing first, one must want to know the importance of adding this signature.
Well, email signatures provide branding consistency, professionalism, and make it easy for recipients to contact you through the added links there. So, you must add a signature to the end of your professional mail to:
- Boost Credibility as a polished signature with key details builds trust with clients.
- Save Time by auto-inserting contact info or a clear call-to-action in every email.
- Marketing Opportunity by showcasing social media handles, websites, and promotions.
Now, let’s dive into the step-by-step guide:
How to Add Signature in Gmail (In Laptop/Desktop)
In order to add your first signature to your email, let’s create it together:
1. Log into Gmail
In order to start creating your signature, you must sign in to your Gmail account on your desktop or laptop.
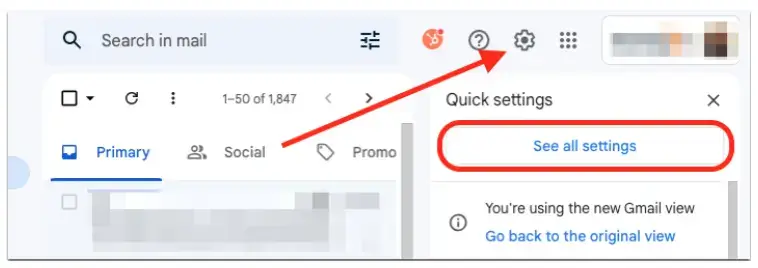
2. Go to Settings
- After signing in, look into the top-right corner of your Gmail interface.
- Click on the gear icon (⚙️) and select “See All Settings” from the drop-down menu.
3. Go to the Signature Section
- Once you are inside the settings page of your account, stay on the “General” tab.
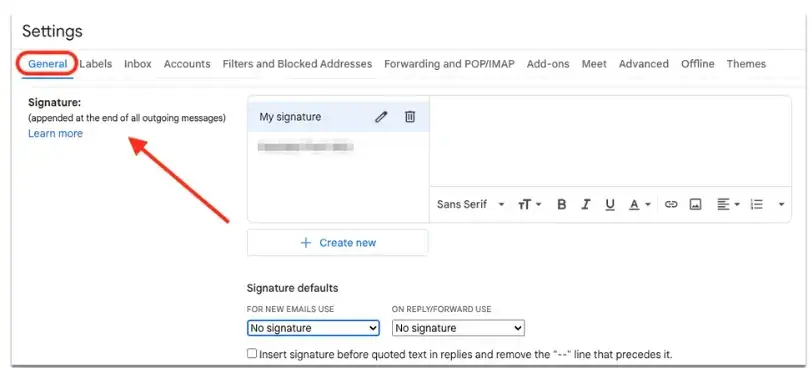
- Scroll down until you find the “Signature” section.
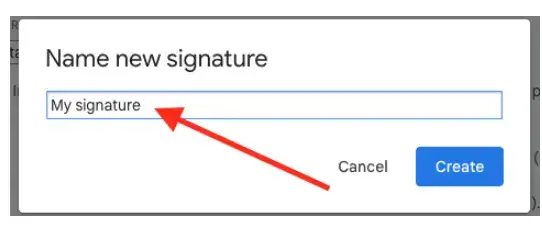
4. Create Your Signature
- Click the “Create New” button.
- A pop-up box will appear. You must enter the name of your signature here such as “Personal” or “Work”.
- Now, fill in the content you want to appear in your signature. This might include your name, job title, company, contact details, and even website or social media links.
5. Format Your Signature
- You can also make your signature stand out by customizing by choosing different fonts, colors, and text sizes.
- You can also add hyperlinks to your website or social media handles for a quick communication setup.
- For more personalization and professionalism, add your logo or a personal image by clicking the image icon.
Pro Tip: Make sure to optimize the size and resolution of the image you have added for emails to avoid slow loading times.
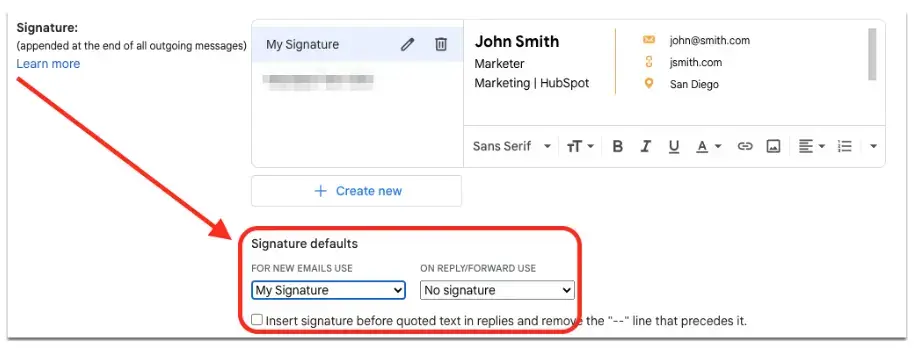
6. Set Default Signature for New Emails and Replies
- After creating your signature, Gmail allows you to assign it as a default for new emails and replies.
- Under the “Signature Defaults” section, select your newly created signature for both new emails and on replies/forwards.
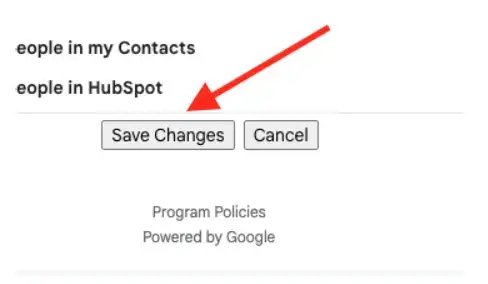
7. Save Changes
Once you are happy with your signature, scroll down to the bottom of the settings page and click “Save Changes”.
How to Add Multiple Gmail Signatures
Gmail allows you to create multiple signatures for different purposes, to use them personally or professionally.
Here is how you can add multiple signatures on Gmail:
- Go to the Settings option in your Gmail and then to the General Settings followed by Signature (Follow the steps mentioned above to get here).
- Click on the Create New option to add another signature along with the previous one.
- Give it a name based on your use such as “Personal”, or “Sales” etc.
- Create and save it for future use.
- Whenever you compose an email, use the pen icon at the bottom of your email to select the appropriate signature based on the email you are sending.
How to Add Gmail Signature in Mobile
The process for adding a signature via the Gmail mobile app is slightly different from adding it to the desktop version.
While the mobile version is limited to plain text, here is how you can add it in the mobile app:
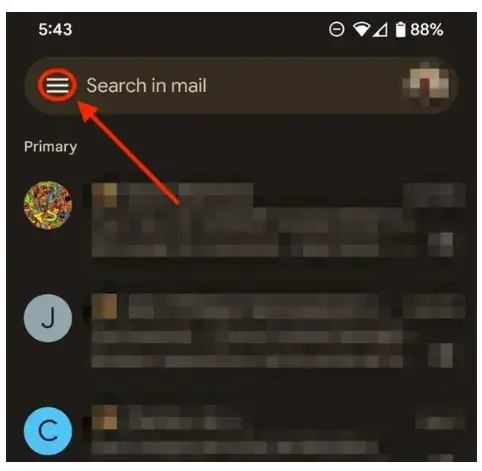
- Open the Gmail app on your mobile.
- Tap the menu icon (three horizontal lines) on the top left corner of the homepage.
- Scroll down and select “Settings”.
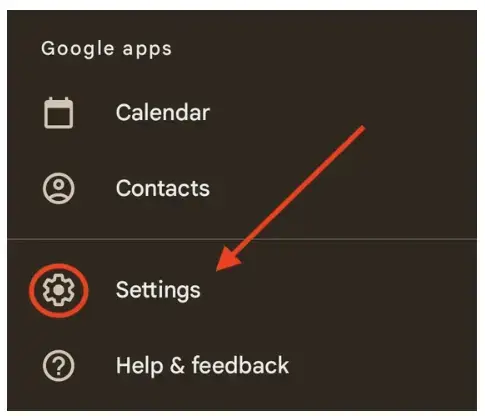
- Choose the email account you want to add a signature to.
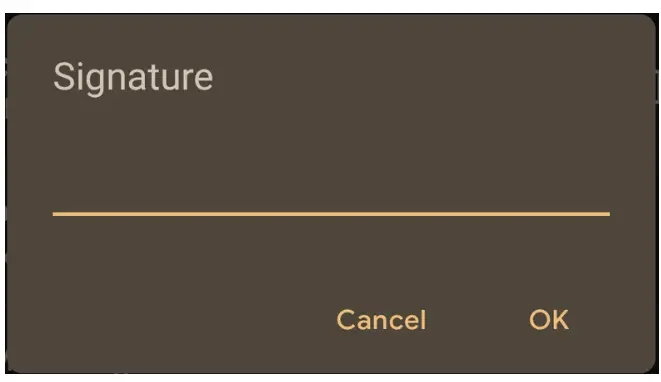
- Tap “Mobile Signature” and type your signature (The mobile app only supports plain text, so you can’t do any formatting or image addition here).
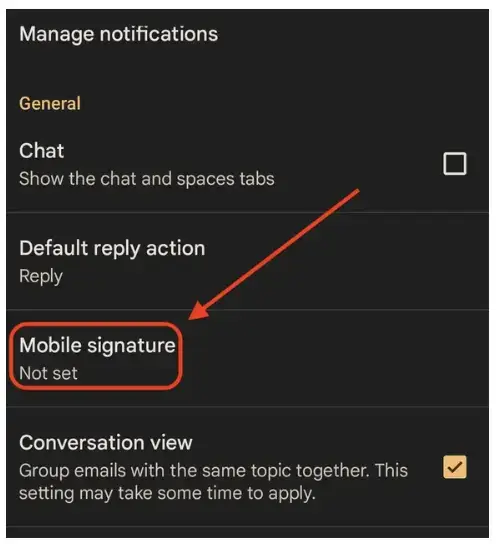
- Once done, tap “OK”.
Tips for Crafting a Professional Gmail Signature
A professional email signature leaves a strong impression.
Here is how to make yours stand out of the crowd:
- Avoid putting too much information to overwhelm readers. Stick to your essentials only (name, job title, and contact info).
- You must include a subtle CTA, such as “Book a Call” with a hyperlink.
- Instead of long URLs, use small, clickable social media icons for LinkedIn, Twitter, and other social media profiles.
- If you work in industries like law or healthcare, consider adding a confidentiality or non-disclosure disclaimer.
- You can also use HTML-based signatures for enhanced design.
How to Add HTML Signature in Gmail
HTML-based signatures offer more design flexibility. You can include styled text, logos, and clickable links with HTML. You can even use different free online Email Signature Generator tools for designing professional-looking signatures.
Here is how you can add an HTML signature:
1. Create Your HTML Signature
You can design an HTML email signature using HTML editors, or code it manually. You may want to include:
- Images (e.g., logos)
- Clickable links (social media, website, phone numbers)
- Formatted text (fonts, colors, sizes)
2. Copy Your HTML Code
Once your signature is ready, copy the entire HTML code from the editor.
3. Paste HTML Code in Gmail Signature Field
- Go to Gmail Settings and then to Signature.
- Open the signature text box.
- Right-click and paste your copied HTML code directly.
- As Gmail supports inline HTML, the signature will automatically format to display links, images, and styles.
4. Preview and Save
- Make sure your signature looks as you want it to be.
- Click Save Changes to apply it.
Here are some tips for adding an HTML signature:
- Make sure your HTML is responsive for different devices.
- Instead of uploading images directly, host them online and use image URLs in your HTML. This will make your images to load correctly in all emails.
- Send a few test emails to yourself or colleagues to verify before using it widely for cross-checking.
How to Replace or Delete Your Gmail Signature
To replace an existing signature:
- Return to Settings > Signature.
- Select the signature you want to replace.
- Delete the content and input the new information.
To remove a signature entirely:
- Go to the Signature section.
- Click Delete next to the existing signature.
- Save your changes.
Common Gmail Signature Issues and Fixes
- If your signature is not showing up, then go to the “Signature Defaults” settings and make sure the signature is set as default there.
- If your signature appears broken or misaligned (formatting issues), then simplify the formatting, especially if you’re using images.
- Gmail signatures on mobile apps are separate from desktops, and they only support plain text. So, update both versions as needed.
Conclusion
Creating a personalized Gmail signature adds a professional touch to your emails. Whether you are creating it for the first time either for personal or professional use, you can follow this easy yet detailed guide to add a signature to your Gmail.
By following these steps, your emails will leave a memorable impression on your audience or customers.